• 복습
<!DOCTYPE html>
<html>
<head>
<meta charset="UTF-8">
<title>Insert title here</title>
<style type="text/css">
body {background: #d0d3c5;}
#second > h2 {margin:auto; padding:0px; text-align: center; color:#796565;}
.red {color: red;}
#signup-form{width :70%; height:200px; margin:auto; padding:20px; text-align: center; font-family: serif; font-size: 14px;}
#signup-form2{width :70%; height:200px; margin:auto; padding:20px; text-align: center; font-family: serif; font-size: 14px; color:#b5372c;}
</style>
<meta name="viewport" content="width=device-width, initial-scale=1.0">
<script src="https://cdn.jsdelivr.net/npm/vue/dist/vue.js"></script>
</head>
<body>
<div id="second">
<h2 v-html="title"></h2>
</div>
<section id="signup_section">
<div id="signup-form">
<h2>Sign Up Form</h2>
<form id="frm" action="main.do" method="post" @submit.prevent="dataCheck">
<label><span>ID</span></label>
<input type="text" id="id" v-model="id" placeholder="아이디입력"><br>
<label><span>PW</span></label>
<input type="text" id="pw" v-model="pw" placeholder="패스워드입력"><br>
<label><span>NAME</span></label>
<input type="text" id="pw" v-model="name" placeholder="이름입력"><br>
<label><span>ADDRESS</span></label>
<input type="text" id="address" v-model="address" placeholder="주소입력"><br>
<label><span>PHONE</span></label>
<input type="text" id="phone" v-model="phone" placeholder="전화번호 입력"><br>
<button type = "submit">사원추가</button>
<label><input @keyup.enter="submit"> Key enter</label> <!-- Enter를 치면 Submit 이벤트 호출 -->
</form>
</div>
<div id="signup-form2">
<fieldset>
<span v-html="id"></span>
<span v-html="pw"></span>
<span v-html="name"></span>
<span v-html="address"></span>
<span v-html="phone"></span>
</fieldset>
</div>
</section>
<script type="text/javascript">
var signup_section = new Vue({
el:'#signup_section',
data:{
id:'',
pw:'',
name:'',
address:'',
phone:''
},
methods:{
dataCheck(){
if(this.id==""){alert(document.getElementById("id").getAttribute("placeholder"));}
if(this.pw==""){alert(document.getElementById("pw").getAttribute("placeholder"));}
}
}
});
var second = new Vue({
el:'#second',
data:{
title:'HELLO WORLD'
}
});
</script>
</body>
</html>


axios
- Axios는 브라우저, Vue.js , Node.js를 위한 Promise API를 활용하는 HTTP 비동기 통신 라이브러리
1) Arrow 함수
2) Vue 라이프 사이클
3) Vue의 비동기 , 동적 데이터 바인딩
• arrow function
<!--
ES6(ECMA 2015)에서 추가된 화살표 함수
1) arrow function
2) let, const 사용법
3) Grave Accent ` `
-------------------
4) eslint, babel
-->
<!DOCTYPE html>
<html>
<head>
<meta charset="UTF-8">
<title>Insert title here</title>
<meta name="viewport" content="width=device-width, initial-scale=1.0">
<script src="https://cdn.jsdelivr.net/npm/vue/dist/vue.js"></script>
<script type="text/javascript">
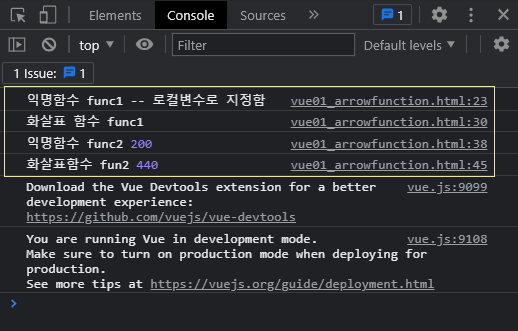
//익명함수 선언법
let func1 = function(){
console.log('익명함수 func1 -- 로컬변수로 지정함');
}
func1(); //순차적으로 메모리에 올라가기 때문에 아래에 호출해야함
//화살표 함수 :: function 이라는 것을 사용하지 않음
func1 = ()=>{
console.log('화살표 함수 func1 ');
}
func1();
//=========================================================
// 익명함수 (argument 포함)
let func2 = function (num) {
console.log('익명함수 func2', num);
}
func2(200);
// 화살표 함수 (argument 포함)
func2 = (num) => {
console.log('화살표함수 fun2' , num);
}
func2(440);
</script>
</head>
<body>
• life cycle
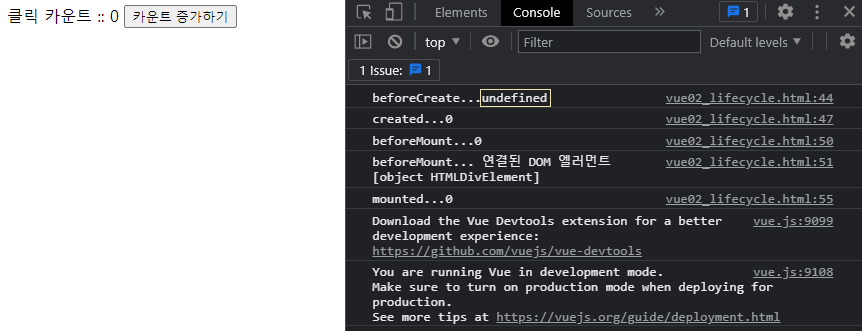
Vue 인스턴스가 생성될때 내부적으로 중요한 몇 단계를 거친다.
이를 라이프 싸이클 메소드(Call Back Method) 로 확인 가능하다.
1. created
vue 인스턴스 생성된 직 후 created 가 Hook(call)된다.
이때 el, data, methods, filters, computed 같은 속성들이 활성화 되어진다.
즉, 사용할 수 있는 속성이 된다. 그 이전에는 사용하면 값이 나오지 않는다.
2. mounted
HTML DOM에 Vue el 에서 지정한 화면 영역 (Vue 인스턴스 객체의 관찰 대상 영역)에 data가 바인딩 되는 과정
이때 mounted 가 Hook된다.
모델에서 받아온 데이터를 el 영역에 렌더링 할때 이 라이프 사이클에서 작업을 한다.
비동기 작업은 여기서 한다.
3. beforeUpdate, updated
값이 변경될 때 마다 렌더링이 반복됨
beforeUpdate, updated 가 번갈아 가면서 반복적으로 Hook
4. destoryed
Vue 인스턴스가 메모리에서 사라짐, destoryed 가 Hook
<!--
	Vue 인스턴스가 생성될때 내부적으로 중요한 몇 단계를 거친다.
	이를 라이프 싸이클 메소드(Call Back Method) 로 확인 가능하다.

	1. created
	   vue 인스턴스 생성된 직 후 created 가 Hook(call)된다.
	   이때 el, data, methods, filters, computed 같은 속성들이 활성화 되어진다.
	   즉, 사용할 수 있는 속성이 된다. 그 이전에는 사용하면 값이 나오지 않는다.

	2. mounted
	   HTML DOM에 Vue el 에서 지정한 화면 영역 (Vue 인스턴스 객체의 관찰 대상 영역)에 data가 바인딩 되는 과정
	   이때 mounted 가 Hook된다.
	   모델에서 받아온 데이터를 el 영역에 렌더링 할때 이 라이프 사이클에서 작업을 한다.
	   비동기 작업은 여기서 한다.

	3. beforeUpdate, updated
	   값이 변경될 때 마다 렌더링이 반복됨
	   beforeUpdate, updated 가 번갈아 가면서 반복적으로 Hook

	4. destoryed
	   Vue 인스턴스가 메모리에서 사라짐, destoryed 가 Hook
 -->

<!DOCTYPE html>
<html>
<head>
<meta charset="UTF-8">
<title>Insert title here</title>
<meta name="viewport" content="width=device-width, initial-scale=1.0">
<script src="https://cdn.jsdelivr.net/npm/vue/dist/vue.js"></script>
</head>
<body>

<div id="app">
	<span> 클릭 카운트 :: {{count}}</span>
	<button @click="count++">카운트 증가하기</button>
</div>

<script>
	new Vue({
		el:'#app',
		data:{count : 0}, //초기값 0
		beforeCreate:function(){
			console.log('beforeCreate...' + this.count);
		},
		created:function(){
			console.log('created...' + this.count);
		},
		beforeMount:function(){
			console.log('beforeMount...' + this.count);
			console.log('beforeMount... 연결된 DOM 엘러먼트'+ this.$el); //이시점이 mounted 시점
			             //this는 vue, el은 vue객체의 속성
		},
		mounted:function(){
			console.log('mounted...' + this.count);
		},
		// 반복호출됨
		beforeUpdate:function(){
			console.log('beforeUpdate...' + this.count);
		},
		// 반복호출됨
		updated:function(){
			console.log('updated...' + this.count);}
	});
</script>
</body>
</html>

• axios
<!DOCTYPE html>
<html>
<head>
<meta charset="UTF-8">
<title>Vue 비동기 기술 :: AXIOS</title>
<meta name="viewport" content="width=device-width, initial-scale=1.0">
<style type="text/css">
	body{ background-color: #ffffff;}
	#second>h2{ margin: 0 auto; text-align: center; border: 1px #ffb319; border-collapse: collapse;}
	#tid{ border: 1px solid #ffb319; margin: 0 auto; text-align: center; border-collapse: collapse;}
	td{ border: 1px solid #ff6666;}

</style>
<script src="https://cdn.jsdelivr.net/npm/vue/dist/vue.js"></script>
<script src="https://unpkg.com/axios/dist/axios.min.js"></script> <!-- 반드시추가! -->

</head>
<body>
<div id="second">
	<h2>KERY SAFE FOOD</h2>
	<p></p>
</div>

<div id = "app">

	<section v-if="errored"> <!-- errored가 true라면 -->
		<!-- axios 결과 에러가 나면 이 부분이 보여짐  -->
		<p> Error In Axios Transport....</p>
	</section>

	<section v-else> <!-- v-if가 아니라면 table이 보여진다 -->

		<!-- finally :: 로딩된 상태부분 -->
		<div v-if="loading">Loading...</div><!-- 처음 loading 중이면 보여지고 비동기 끝나면 안보임 -->

		<table id="tid"> <!-- json  영역 -->
			<thead>
				<tr>
					<th>분류</th><th>이름</th><th>이미지</th>
				</tr>
			</thead>
			<tbody>
				<tr v-for="food in foods" style="border: 1px solid #ff6666;">
					<td>{{food.productGb}}</td>
					<td>{{food.prdlstNm}}</td>
					<td><img :src="food.imgurl1" width="60px" height="60px"></td><!-- v-bind -->
				</tr>
			</tbody>
		</table>
	</section>
</div>

<script type="text/javascript">
	new Vue({
		el:'#app',
	// data:{} 정적인 데이터 바인딩
	// data(){} 동적인 데이터 바인딩
		data(){
			return{
				foods:null, // json 의 key, value는 객체이기 때문에 초기화를 null로 줌
				errored:false, //에러가 나지 않음
				loading:true // 로딩이 되고 있다
			}
		},

	// 비동기 :: axios 기술
		mounted(){ //mounted 가 호출될 때 비동기 적용하겠다.
			axios
			.get("./food.json") // 사이트 연결해서 data 받아오는 곳
			// ex) axios.get("http://203.123.108.24:8899/food") :: 다른서버
			.then(response=>(this.foods = response.data)) //응답받은 데이터를 return 의  food 객체로 리턴
			.catch(error=>{
				console.log(error); //에러가 나면 켜지는 곳!
				this.errored = true; // vue 속성값을 다르게 할당
			})
			.finally(()=>this.loading=false) // 비동기 서버와의 연결에 있어서 모든 로딩이 끝났음을 알린다.
		}
	})
</script>
</body>
</html>

<!DOCTYPE html>
<html>
<head>
<meta charset="UTF-8">
<title>Insert title here</title>
<style type="text/css">
	body{ background-color: #ffffff;}
	#second>h2{ margin: 0 auto; text-align: center; border: 1px #ffb319; border-collapse: collapse;}
</style>
<meta name="viewport" content="width=device-width, initial-scale=1.0">
<script src="https://cdn.jsdelivr.net/npm/vue/dist/vue.js"></script>
<!-- axios cdn 추가 -->
<script src="https://unpkg.com/axios/dist/axios.min.js"></script>
</head>


<body>
<div id = "second">
	<h2>National Flags</h2>
</div>

<div id="app">
	<!-- 조건부 랜더링 -->
	<section v-if="errored">
		<p>Error in Axios...</p>
	</section>

	<section v-else>
	<ul>
		<li v-for="flag in flags">
			<span v-html="flag.name"></span>
			<img :src="flag.flag">
		</li>
	</ul>
	</section>
</div>

<script type="text/javascript">
	new Vue({
		el:'#app',
		data(){
			return{
				flags:null,
				errored:false,
				loading:true
			}
		},
		mounted(){
			// 서버라 가정하고 flags.json 데이터로 요청을 한다.
			// 응답받은 결과를 app영역에 잘 랜더링 한다.
			// errored와 loading도 catch, finally 부분과 잘 연결해서 화면 영역에 추가한다.
			// 마지막으로 필요한 css처리는 해서 결과 보도록 하자.
			axios
			.get("./flags.json")
			.then(response=>(this.flags = response.data.nationalflags)) //json 파일을 열어서 안에 묶여있는지 봐야한다.
			.catch(error=>{
				console.log(error);
				this.errored = true;
			})
			.finally(()=>this.loading=false)
		}
	});
</script>
</body>
</html>

flask
플라스크(Flask) 파이썬으로 작성된 마이크로 웹 프레임워크
• 환경설정

pip install flask
'''
Flask 웹 서비스 만드는 순서
1. flask 모듈 import
2. app 라는 이름으로 Flask 객체 생성
3. app 라는 변수에 웹 서비스 기능을 추가
- @app.route("/")
- route란? 클라이언트 요청을 route로 받는다.
Flask 서버에서 여러가지 url로 이동하기 위한 일종의 문법
4. app를 run시킨다. 이 때 host, port를 지정한다.
- http://www.daum.net --> 80 port가 돈다.
- https://www.daum.net --> 443port가 돈다.
'''
# flask 라이브러리에서 Flask 함수 로딩한다.
# flask 라이브러리는 서버의 핵심적인 기능을 가지고 있는 모듈 -- Flask
from flask import Flask
# Flask 객체를 생성 -- 변수에 할당
app = Flask(__name__) # 생성자
print(__name__) # 해당 파일이 직접 호출 대상이라면 __main__이 출력된다.
print(app) # 객체 호출
# 클라이언트에서 들어오는 요청을 받아들일 수 있어야 한다.
# app를 이용해서 라우팅 시킨다.
@app.route("/") # /이렇게 요청이 들어온다 :: http://127.0.0.1:7777/
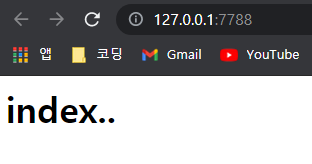
def index():
return "<h1>INDEX PAGE</h1>"
# FLASK 서버를 가동시킨다
if __name__ == "__main__":
app.run(host="0.0.0.0", port="7788") # 서버호출 , "0.0.0.0" :: localhost


# 클라이언트에서 들어오는 요청을 받아들일 수 있어야 한다.
# app를 이용해서 라우팅 시킨다.
@app.route("/")  # /이렇게 요청이 들어온다 :: http://127.0.0.1:7777/
def index():
    return "<h1>INDEX PAGE</h1>"
from flask import Flask
app = Flask(__name__)
@app.route("/")
def index():
return "<h1>index..</h1>"
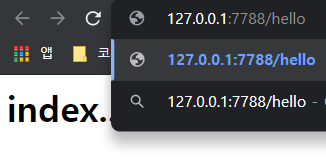
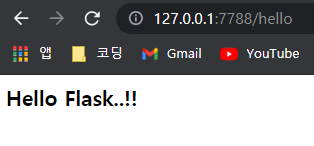
@app.route("/hello")
def flask_hello():
return "<h3>Hello Flask..!!</h3>"
if __name__ == "__main__":
app.run(host="127.0.0.1", port="7788")
# ctrl + c 로 서버 끄고 다시 돌려야함
# url 나오면 ctrl + 클릭 해서 확인, /hello치면 다른 페이지 뜸
• 라우팅 심화 -- Vue의 Axios 기술과 연결
# 라우팅 심화 -- Vue의 Axios 기술과 연결
# 클라이언트 비동기 요청시 변수로 값 전달
from flask import Flask
app = Flask(__name__)
@app.route("/")
def index():
return "<h2>Index page</h2>"
# ---1. string
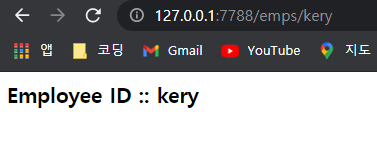
# http://127.0.0.1:7788/emps/hyeri
@app.route("/emps/<empid>") # <empid> 값을 전달, string이 기본타입이다.
def get_employee(empid):
return "<h3>Employee ID :: " + empid + "</h3 >"
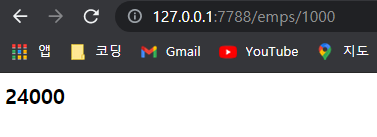
# ---2. int
def annualSalary(amount):
return amount * 12 + 12000
@app.route("/emps/<int:sal>")
def get_salary(sal):
totalSalary = annualSalary(sal)
return "<h3>%d</h3>" % (totalSalary)
# url에 실수형을 변수로 전달할 때는 :: float:sal, %f 로 변경해주면 된다
if __name__ == "__main__":
app.run(host="127.0.0.1", port="7788")

• flask - html 연결

<!-- html:5 자동완성 누르면 화면 만들어짐-->
<!DOCTYPE html>
<html lang="en">

<head>
    <meta charset="UTF-8">
    <meta name="viewport" content="width=device-width, initial-scale=1.0">
    <title>Document</title>
</head>

<body>
    <form action="login" method="GET">
        <!--
            defalut :: get, server인데 같은 domain 을 사용한다 = local
            http://127.0.0.1:7788/login 으로 쓰지 않는 이유는 같은 domain이기 때문에 !!
        -->
        <!--live server 이용 -->
        <p>Enter ID : <input type="text" name="user_id"></p>
        <p>Enter PASSWORD : <input type="password" name="user_pw"></p>
        <p><input type="submit" value="LOGIN"></p>
    </form>
</body>

</html>
# request 모듈을 추가한다.
# 실제 웹 화면과 서버를 연결하려면 화면의 모든 요청정보를 담고 있는 request모듈을 import해야한다.
from flask import Flask, request, render_template
app = Flask(__name__)
# 정적인 페이지를 리턴하도록 랜더링한다. render_template
@app.route("/")
def index():
# html 파일은 templates 폴더에 위치해야하고 이런 정적인 문서를 render_template()
return render_template("login.html")
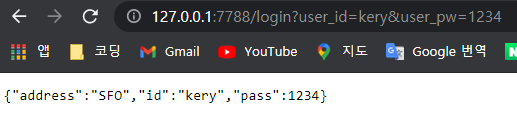
@app.route("/login") # 라우팅 경로 설정
def login(): # login으로 요청이 들어오면 login() 함수가 실행됨
'''
controller 기능
1. 폼값받는다.
2. DAO 생성
3. DAO 메소드 호출 -- DB 전달, 리턴받는다.
4. 데이터 응답
'''
user_id = request.args.get("user_id") # form의 이름 ("user_id")를 넣고 값을 리턴받는다.
user_pw = request.args.get("user_pw")
print(user_id, user_pw)
# DB 연결되어서 들어갔다 다시 나왔다고 생각해보자
if user_id == "kery":
user_data = {'id': 'kery', 'pass': 1234, 'address': 'SFO'}
else:
user_data = {'id': 'fail'}
return user_data
if __name__ == "__main__":
app.run(host="127.0.0.1", port="7788")

• flask - bootstrap 연결 (Customizing)
Bootstrap
The most popular HTML, CSS, and JS library in the world.
getbootstrap.com
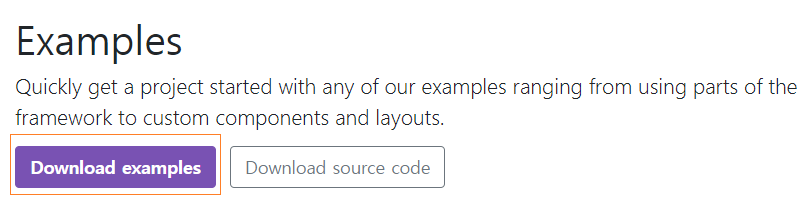
1. Download examples 다운받기
2. 압축 푼 후 파일을 vscode에 넣기

3. 파일 경로를 아래와 같이 확인한다.

4. 사각형으로 표시해둔 css를 적용하기 위해 brand, dist 파일도 압축 폴더에서
가져와 02_login 폴더에 옮긴다.

5. 커스터 마이징한 index.html
<!doctype html>
<html lang="en">
<head>
<meta charset="utf-8">
<meta name="viewport" content="width=device-width, initial-scale=1">
<meta name="description" content="">
<meta name="author" content="Mark Otto, Jacob Thornton, and Bootstrap contributors">
<meta name="generator" content="Hugo 0.88.1">
<title>Signin Template · Bootstrap v5.1</title>
<link rel="canonical" href="https://getbootstrap.com/docs/5.1/examples/sign-in/">
<!-- Bootstrap core CSS -->
<link href="../static/dist/css/bootstrap.min.css" rel="stylesheet">
<style>
.bd-placeholder-img {
font-size: 1.125rem;
text-anchor: middle;
-webkit-user-select: none;
-moz-user-select: none;
user-select: none;
}
@media (min-width: 768px) {
.bd-placeholder-img-lg {
font-size: 3.5rem;
}
}
</style>
<!-- Custom styles for this template -->
<link href="../static/signin.css" rel="stylesheet">
</head>
<body class="text-center">
<main class="form-signin">
<from action="login">
<img class="mb-4" src="../static/brand/bootstrap-logo.svg" alt="" width="72" height="57">
<h1 class="h3 mb-3 fw-normal">Please sign in</h1>
<div class="form-floating">
<input type="text" name="user_id" class="form-control" id="floatingPassword" placeholder="Password">
<label for="floatingPassword">ID</label>
</div>
<p></p>
</from>
<div class="form-floating">
<input type="password" name="user_pw" class="form-control" id="floatingPassword" placeholder="Password">
<label for="floatingPassword">Password</label>
</div>
<div class="form-floating">
<input type="email" name="user_address" class="form-control" id="floatingInput" placeholder="name@example.com">
<label for="floatingInput">Email address</label>
</div>
<p></p>
<div class="checkbox mb-3">
<label>
<input type="checkbox" value="remember-me"> Remember me
</label>
</div>
<button class="w-100 btn btn-lg btn-primary" type="submit">Sign in</button>
<p class="mt-5 mb-3 text-muted">© 2017–2021</p>
</form>
</main>
</body>
</html>


'|Playdata_study > JavaScript' 카테고리의 다른 글
| 210914_Vue.js2 (Axios, flask - CORS) (0) | 2021.09.15 |
|---|---|
| 210910_Vue.js(event : v-cloak, v-once) (0) | 2021.09.10 |
| 210909_Vue.js(v-for, v-if, v-show) (0) | 2021.09.09 |
| 210908_jQuery UI/Vue.js(Mustache, Directive, v-bind) (0) | 2021.09.08 |
| 210907_jQuery_Ajax (servlet, LocalStorage) (0) | 2021.09.07 |


댓글